
How to Create HTTPS Proxy Servers with Go
John Chavez
August 3, 2020
Intro
Have you ever wanted to put your files in one place and be able to access them from all of your devices? Or maybe you’ve done some cool work in a Jupyter Notebook or RStudio, and wanted to show it to your friends, but then realized that you can’t pull your work up on your phone?
Having a secure personal server can solve both of these problems, and much more. I personally use the method described here to run 3 process on HTTPS 24/7, including my file browser, RStudio, and Urbit. (These are all password protected, obviously.)
The Code
If you’re reading this just to see the Go code, here it is:
package custom

import(
    "log"
    "net/http"
    "net/http/httputil"
    "net/url"
)

func MakeProxy(origin, target string){

    og, _ := url.Parse(origin)

    d := func(req *http.Request){
        req.Header.Add("X-Forwarded-Host", req.Host)
        req.Header.Add("X-Origin-Host", og.Host)
        req.URL.Scheme = "http"
        req.URL.Host = og.Host
    }

    proxy := &httputil.ReverseProxy{Director: d}

    http.HandleFunc("/",
        func(w http.ResponseWriter, r *http.Request){
            proxy.ServeHTTP(w,r)
        })

    cert := "/home/jc/file-home/go/pems/cert.pem"
    key := "/home/jc/file-home/go/pems/privkey.pem"

    log.Fatal(http.ListenAndServeTLS(target, cert, key, nil))

}
Replace cert & key with the paths to your own SSL certificate files. Then, run each proxy in its own script such as:
package main

import "custom"

func main() {
    custom.MakeProxy("http://localhost:8080", ":9090")
}
If you’d like a more in-depth explanation of this script and how to set it up, then continue reading.
Why HTTPS?
There are plenty of online guides that can teach you how to access processes on a computer over HTTP. For example, it’s pretty straightforward to follow this guide and access an always-on RStudio server session.
However, none of these guides make note of the serious security risks that come with using HTTP. Anybody can snoop on the data sent via HTTP traffic. Any time you submit a password or receive data over HTTP, someone could easily intercept it. There are even free apps that spy on HTTP traffic for you, including Wireshark and Fiddler.
One of the best ways around this is ngrok, which allows you to reverse proxy any loopback or HTTP process to an HTTPS ngrok.io link. However, ngrok only allows you to run 1 proxy on the free plan and 2 on the $12/month plan. This blog post might be thought of as “How to reverse-engineer your own infinite ngrok,” because the end result will be much like running as many ngroks as you’d like.
Getting certified
The first step to creating an HTTPS server is getting SSL certificates. You can do this for free by following these three steps.
1) Get a free domain
Let’s Encrypt requires you to have a DNS record associated with your computer. This is a bit annoying but it also makes it easier to remember your personal server’s address (i.e. https://206.189.70.108:9090 vs. https://droplet.cf:9090).
Freenom allows you to obtain a free domain for up to a year. If this seems too good to be true, it’s because their domains have odd extensions like .cf and .tk. However, you can usually get a pretty short and good domain, like droplet.cf. I’m not sure if you can renew your subscription; I’m just waiting til a year passes and I’ll figure it out then.
2) Set DNS Records
Once you have a domain, you want to make sure that it redirects to your server. Simply add two A records to your domain’s DNS registry: www.[domain] -> [ip] and [domain] -> [ip]. So, if your IP was 1.2.3.4 and your domain was hello.ml, your two A records would be www.hello.ml -> 1.2.3.4 & hello.ml -> 1.2.3.4 .
You can check if you’ve done this correctly if navigating to wwww.hello.ml takes you to what you’d see on 1.2.3.4:80. Run some process on port 80 to check this if you’re unsure.
3) Get SSL Certificates
Now that you’ve got a domain that redirects to your IP, all you need to do is run Certbot on your server. Follow the steps here to run Certbot. By default, your keys will be stored in /etc/letsencrypt/live/[your_domain]/ .
You’re good to go now! You will be able to connect these SSL certificates with any Go script or web server you’d like, and you got it all for free.
Running the server
Now you’ve reached the fun part! You’re ready to proxy some processes over HTTPS.
Start by finding your Go source directory. This is $GOROOT/src, which for me is /usr/local/go/src. This could easily be different for you; just enter echo $GOROOT into your terminal to find out what your root Go directory is.
The way to build packages in Go is to put a folder in your Go root directory and then place your Go scripts in that folder. For me, the following Go script is located in /usr/local/go/src/custom, and the file is called custom.go:
package custom

import(
    "log"
    "net/http"
    "net/http/httputil"
    "net/url"
)

func MakeProxy(origin, target string){

    og, _ := url.Parse(origin)

    d := func(req *http.Request){
        req.Header.Add("X-Forwarded-Host", req.Host)
        req.Header.Add("X-Origin-Host", og.Host)
        req.URL.Scheme = "http"
        req.URL.Host = og.Host
    }

    proxy := &httputil.ReverseProxy{Director: d}

    http.HandleFunc("/",
        func(w http.ResponseWriter, r *http.Request){
            proxy.ServeHTTP(w,r)
        })

    cert := "/home/jc/file-home/go/pems/cert.pem"
    key := "/home/jc/file-home/go/pems/privkey.pem"

    log.Fatal(http.ListenAndServeTLS(target, cert, key, nil))

}
Thankfully for us, Go’s standard library comes prepacked with the ReverseProxy function in net/http/httuptil. This function does the bulk of the work in our script; the rest is just telling it our specific parameters (the director d) and serving the reverse proxy over HTTPS (the HandleFunc and ListenAndServeTLS).
You need to replace the values of cert & key with the filepaths for the .pem files that Certbot creates.
Now that this custom package exists, we can call it in a Go script anywhere. Wherever is convenient for you, you can start an HTTPS proxy with one function call:
package main
import "custom"
func main() {
custom.MakeProxy("http://localhost:8080", ":9090")
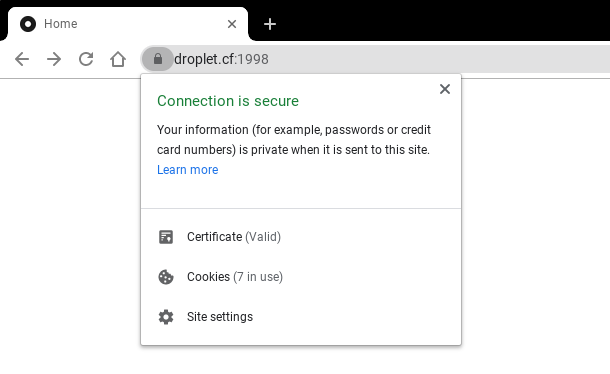
}That script is actually being run at this very moment. It proxies the loopback process of FileBrowser from port 8080 to https://droplet.cf:9090. That’s all there is to it!
I hope this guide serves you well. Happy proxying!